
Preset Upgrade Causes Desaturation in Blues
Exposure X3 introduced changes that allow more precise color adjustments. One of these changes redefined of Color Saturation sliders for Cyans and Blue to more accurately reflect visual perceptions of those colors.
In most cases this is not noticeable and presets will look identical. Factory presets have been tested to compensate for this change. However, it is possible for user presets to change if they have large differences between Blue and Cyan saturation.
User presets with Color Saturation sliders Cyan and Blue roughly equal will not show a problem. The more different these sliders are, the more difference you will see between earlier versions and X3's rendering.
Solution
Even though there are differences, minor adjustments to the sliders can be made and the preset re-saved.
1: Select a user preset and open the Color panel.
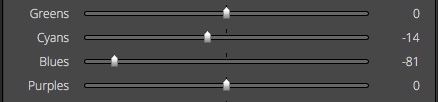
2: Look at the the Cyans and Blue sliders.
If the sliders are at zero or within a few points there is no need to update the preset.
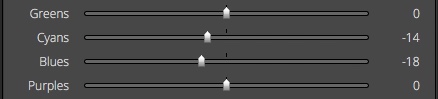
If the sliders are very different you may see a difference between X3 rendering and earlier versions.
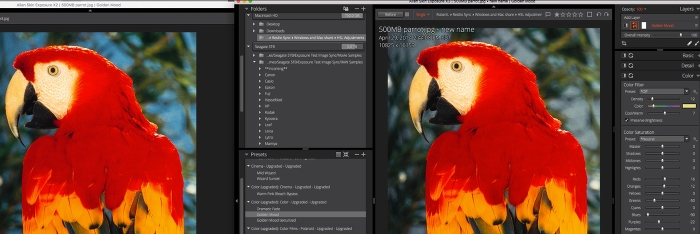
3: It is helpful to compare the preset rendering with the same image in an earlier version.
This example shows Exposure X2 (left) and Exposure X3 (right). Both are using the same preset, but the sky looks different. Moving the Blue slider closer to the Cyans value will return the original look.
4: Once the preset rendering looks like the earlier version, save the preset.
Select Edit > Save as User Preset or use the keyboard shortcut: Cmd+S for Mac, and Ctrl+S for Windows. Save it with the same name or rename if desired.
Have more questions? Submit a request.