
What is the difference between the Detail and Focus Panels?
In Exposure, the Detail and Focus panels both have tools for sharpening. The sharpening adjustments are similar, but they serve separate purposes.
Use the Detail panel to correct and refine your digital images. The sharpening controls are included to balance the noise reduction adjustments. They have a limited adjustment range for a subtle effect.
Use the Focus panel to simulate lens focus adjustments. The sharpening controls are for creative use so the sliders can give stronger effects.
This article covers the adjustments available in each panel.
Note: This article applies to Exposure X, and later versions. Exposure 7 and before only had Focus adjustments.
Detail Panel
The Detail panel has sections for sharpening and noise reduction. Use it for image correction and refinement. In this case, sharpening will balance any noise reduction adjustments. They have a limited adjustment range for a subtle effect.
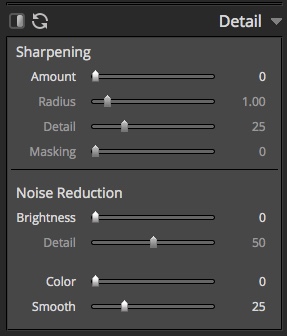
Sharpening Controls
The Amount slider controls overall sharpening. Hold the ALT key while moving the slider to visualize the effect.
Radius controls the sizes of the edges you want to enhance. Hold the ALT key while moving the slider to visualize the effect.
Detail boosts fine texture. Raising it too high will give a grainy look.
Masking controls where sharpening is applied. Turn it up to only sharpen strong edges. Hold the ALT key while moving the slider to visualize the effect.
Noise Reduction Controls
Exposure has two separate tools for noise reduction.
Use the Color and Smooth sliders to remove color variations. Color controls the overall amount, while Smooth blurs patches of color.
Once you’ve removed the color noise, use the Brightness and Detail sliders to remove monochrome noise.
Brightness adjusts the overall amount of noise reduction. Higher values of Detail preserve sharp edges.
Focus Panel
The Focus panel simulates changes in lens focus. It has adjustments to sharpen or blur the image. Use this panel to simulate lens focus or set a specific mood. These controls are for creative use so the sliders can give stronger effects.
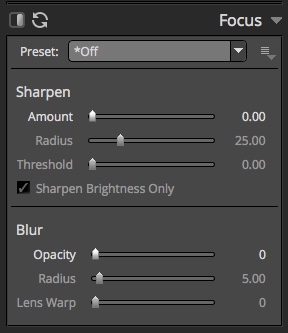
Use the Preset dropdown to quickly try specific looks.
Sharpen Controls
Amount adjusts the intensity of unsharp mask. Think of it as how much contrast is added to the edges.
Radius controls the width of the edges you want to enhance. Radius and Amount are related. Reducing one allows you to use more of the other.
Threshold controls the minimum brightness change that will be sharpened. Higher values will exclude more areas from sharpening.
Blur Controls
Opacity controls the visibility of the blurring effect.
Radius adjusts the distance that features are blurred (relative to image size, rather than pixels).
Lens Warp adjusts the amount of blur at the edges relative to the center.
Have more questions? Submit a request.