
Importing Overlays
Exposure enables you to import your own overlays. This article reviews the overlay categories, how the blend modes work, and shows you how to add your own overlays.
Overlay Categories
The three overlay categories represent different ways an image can be altered. The categories can be layered depending on the effect desired.
Border shows film frames or print edges. Factory borders use the Opacity blend mode (discussed below) and are usually on the edges, leaving the middle unchanged.
Light Effect shows the effects of light entering the lens or in the film. Factory light effects use the Screen blend mode and can cover any part of the image.
Texture shows effects like print media, dust, or other textures that affect the entire image. The blend mode depends on the desired effect.
Blend Modes
The blend mode controls how the overlay will interact with your base image. Exposure X3 and later versions allow blend mode adjustments in the user interface after import. Exposure X2 and earlier versions are fixed after import.
Opacity: This mode requires the imported image to have transparency information. Areas where the overlay image is transparent will allow the base image to show through. This blend mode requires TIFF or PNG files that can contain transparency information.
Multiply (Darker): The color values for each pixel in the base image are multiplied by the corresponding pixels in the overlay. This results in an overall darker image.
Screen (Lighter): The color values for each pixel in the base image are divided by the corresponding pixels in the overlay. This results in an overall lighter image.
Overlay: Combines Multiply and Screen modes. Areas where the overlay is light will become lighter and areas that are dark will become darker. Middle values are not affected.
Hard Light: Combines Multiply and Screen modes, but changes are based on the base image. Areas where the base image is light will become lighter, and areas where the base image is dark will become darker.
File Type and Size
JPEG, TIFF, and PNG files can all be used as overlays. The Opacity blend mode requires TIFF or PNG files with an opacity (Alpha) channel.
An image size around 12 megapixels (4000 x 3000 pixels) will work great unless you have a specific need for a smaller or larger version.
Adding an Overlay
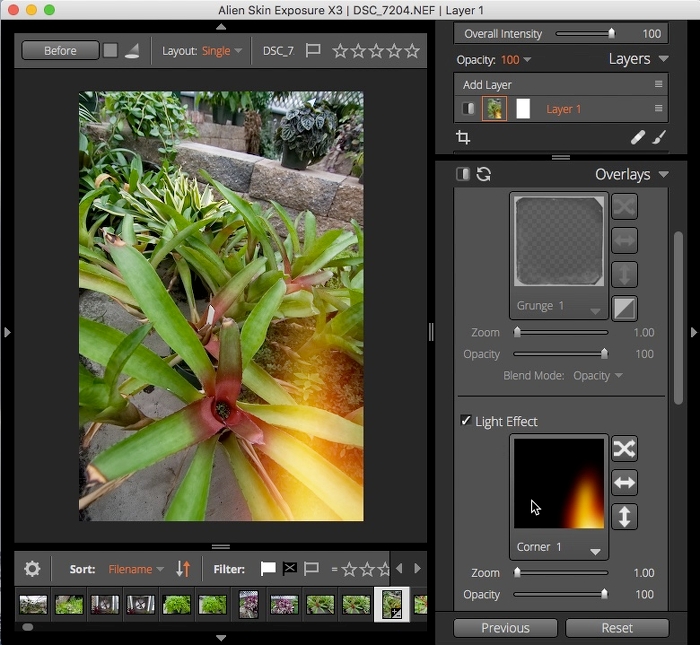
1. In the Overlays panel, select an overlay category.
2. Click on the overlay preview to open the selection menu.
3. Click Import to add a new overlay. A file browser window will open.
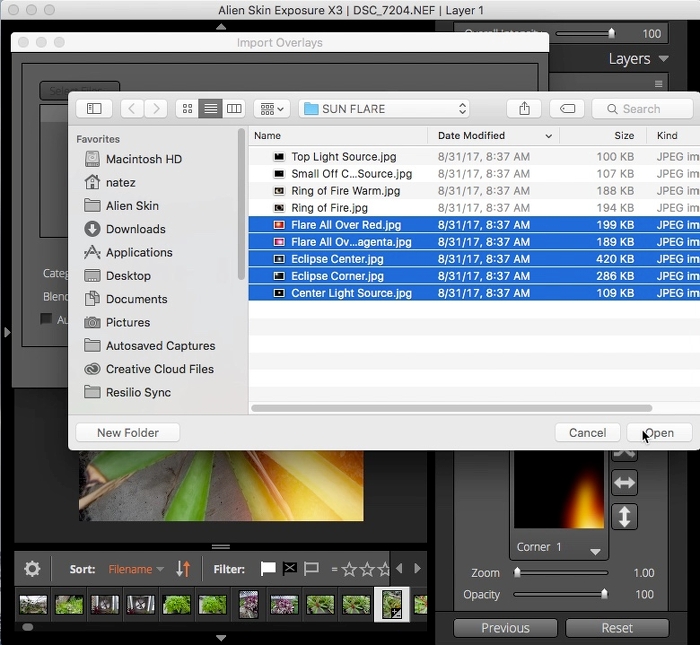
4. Navigate to and select the image file(s) you want to add and select Open.
Note: Exposure X3 and later versions allow batch import. Exposure X2 and earlier versions are limited to one image at a time.
5. The Import Overlay dialog will show a thumbnail of the new overlay(s). The main preview window will show the effect of the overlay on your image.
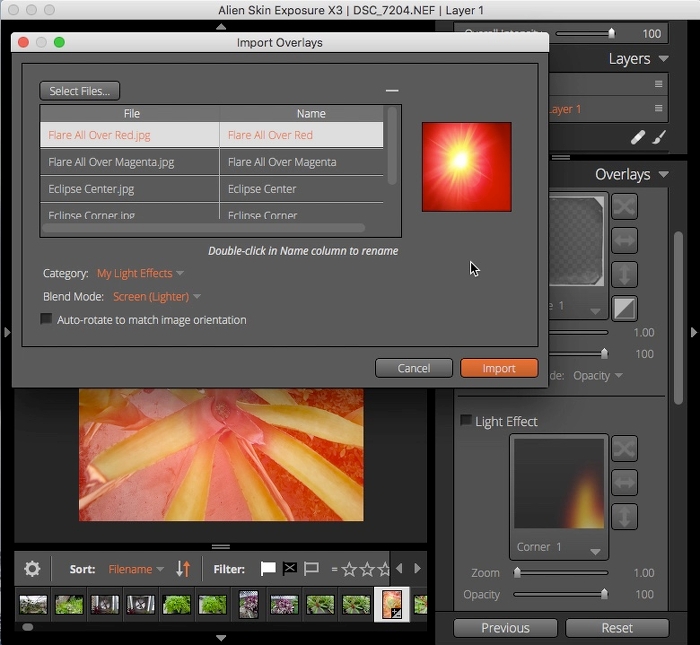
File: If you want to change the file(s), click the Select Files button, or browse icon (...) in earlier versions, to reopen the file browser.
Name: By default this is the original file name, which you can rename.
Category: The default for import is My Textures. You can choose other factory categories or create your own.
Blend Mode: Choose the blend mode that works best with the overlay. The preview window will change to show the effects of any blend mode you select.
Auto-rotate to match image orientation: When checked, the texture will automatically rotate to match the orientation of the image. This is recommended for borders and textures.
6. Press the Import button when complete. The new overlay(s) can be applied to your base image.
Have more questions? Submit a request.