
Selective Presets
Exposure's selective preset features give you a great deal of creative control, enabling you to create presets that affect only certain settings.
Note: Selective Presets are featured in the Exposure X2 Advanced Layers Update (released April 2017) and later versions. Earlier versions of Exposure do not have selective presets. If you have an earlier version, this article covers how updated factory presets will affect your workflow, and how to use the selective preset save features.
Updated Factory Presets
Factory presets do not affect adjustments in the following categories.
- Basic Panel Adjustments
- Detail Panel Adjustments
- Overall Intensity
- Crop and Rotate (only available in standalone)
- Spot Heal
- Lens Correction
This means that you can make image corrections like exposure, sharpening, cropping, or spot healing and then apply different presets. Your image corrections will be retained.
Note: User presets from older versions may not work this way. See the Update older presets section to learn how to update them.
Saving a User Preset
Exposure enables you to create presets that affect only certain settings. When you apply the selective preset, only the parameters that you chose when it was created will affect the image. This example shows how to create a preset for a specific tone curve.
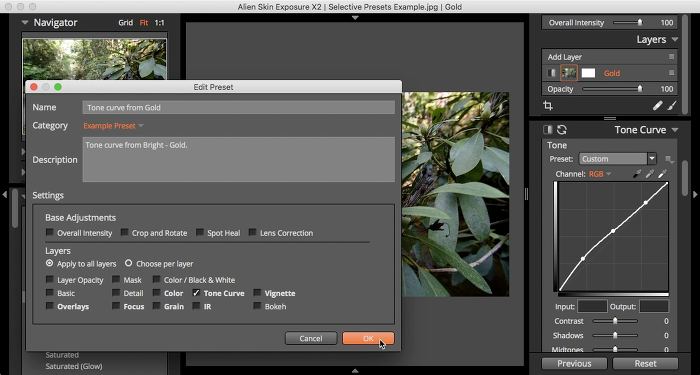
- Select a preset, or make a set of edits that you would like to save as a preset.
- Select Edit > Save as User Preset or use the keyboard shortcut: Cmd+S for Mac, and Ctrl+S for Windows. The Edit Preset dialog will appear.
- In the Name field, give the preset a name.
- In the Category field, select a category for the new preset.
- In the Description field, add notes that you find useful. Note: If you have tool tips turned on, this will show when you hover over the preset.
- In the Settings section, choose from the following settings:
- Base Adjustments are settings that affect the entire image. By default, these are not selected.
- Layers enables you to include or exclude layers from the preset you are creating. If the current image has multiple layers, you can select the effects from all or individual layers.
- Select all the settings that you want to change when you apply your preset. Note: All categories that have adjustments are bold.
- Uncheck Basic if you want the preset to act like factory presets.
- Click OK to finish. When you apply the new example preset to an image only the tone curve will change. Any other settings you have made will stay the same.
Selective Settings when Copy/Pasting
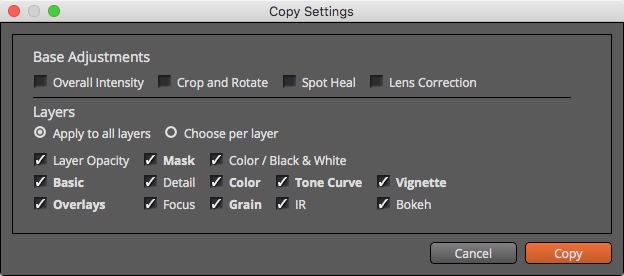
- Make a set of edits to an image.
- Select Edit > Copy Settings or use the keyboard shortcut: Cmd+Shift+C for Mac, and Ctrl+Shift+C for Windows. The Copy Settings dialog will appear.
- If you want to skip the dialogue and copy all settings, Select Edit > Copy All Settings or use the keyboard shortcut: Cmd+Alt+C for Mac, and Ctrl+Alt+C for Windows.
- Select or deselect the settings you wish to bring to another image.
- Base Adjustments are settings that affect the entire image. By default, these are not selected.
- Layers enables you to include or exclude layers from the preset you are creating. If the current image has multiple layers, you can select the effects from all or individual layers.
- Select all the settings that you want to change when you apply your preset. Note: All categories that have adjustments are bold.
- Uncheck Basic if you want the preset to act like factory presets.
- Click Copy.
- Select another image or group of images.
- Select Edit > Paste Settings or use the keyboard shortcut: Cmd+Shift+V for Mac, and Ctrl+Shift+V for Windows. The selected settings will be applied to the image(s).
Updating Older Presets
In earlier versions of Exposure, applying a preset would change all adjustment parameters. If you imported user presets from earlier versions, they will behave the same way. This video shows how Basic panel adjustments are affected by new and old style presets.
If you want your user preset to behave like like the factory presets in Exposure X2 Advanced Layers Update and later, you will need to save it again.
- Select your user preset
- Click Edit > Save as User Preset. (Keyboard Shortcut: Command+S Mac Control+S Windows). The Edit Preset dialog will appear.
- Uncheck the Basic category.
- Make any other changes you like. Rename the preset if desired.
- Click OK. If you did not rename the preset, then you will be asked if you want to replace the original.
Have more questions? Submit a request.